Apart from the basic setup like updating Windows and installing drivers, Windows 10 has many settings that are worth tweaking for the optimum experience. I like my PC running at maximum performance while ensuring no unwanted background processes are hindering the system. If you want a similar experience, keep reading, and I’ll share some important changes you can make to default Windows 10 settings to optimize your experience.
Disable Delivery Optimization
I dislike Windows 10 because of its constant use of the network to either exchange data with Microsoft servers or keep the PC updated. This directly affects your network performance, which is more visible if you play an online game or have limited internet data. Although you can’t stop most of the data exchange as they are somewhat necessary to keep the system up-to-date, you can stop your network from being used to update other unknown PCs. Windows 10 uses Windows Update Delivery Optimization (WUDO) method to deliver updates to PCs. This is basically a peer-to-peer delivery system where the updates that are already downloaded to your PC may be uploaded to another PC to save bandwidth. This system is only there to help Microsoft save internet bandwidth. However, if you have limited data or don’t want any network issues while doing important work, then you may disable this feature. Here’s how to do it:
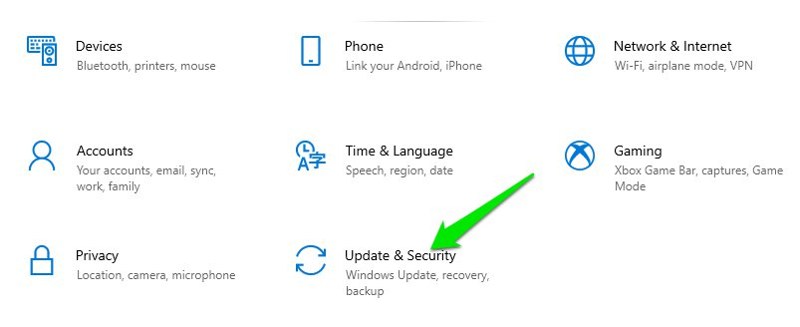
Go to Windows 10 Settings from the Start menu and click on Update & Security.
Now click on the Delivery Optimization option in the left panel and turn off the toggle button to disable this feature.
Optimize Power options
Using the correct Windows power plan is necessary for your PC’s proper working, especially if you are using a laptop. However, I always recommend everyone to customize their preferred power plan personally to make sure it’s optimized to your needs. Windows might have well set up power profiles to get the performance or save power, but they are far from perfect. You should optimize Windows power plans according to your need, and to help with understanding each power option, you can refer to this guide to all of Windows 10 power options. In this guide, I have provided a clear description of what each Windows power option does and how you can optimize them for the best results.
Manually set the Windows page file.
The page file is basically a space on your PC’s storage drive to store passive processes as a cache to free up RAM. This file is why your PC can handle processes that are even bigger than your installed RAM. Although Windows does a fine job of handling the page file, I have had trouble before with having a smaller page file compared to my needs. Even when I had 8GB of RAM, I ended up being short on RAM as the page file on my SSD was too small. Therefore, I always manually set the page file size after reinstalling Windows. If you also have smaller RAM (8GB or below), I recommend increasing the page file size to accommodate the RAM better and keep the PC running smooth.
Press Windows+Pause keys on the keyboard to open System Settings. Afterward, click on Advanced system settings in the left panel.
In the System Properties, click on Settings under the Performance section.
Now move to the Advanced tab and click on Change under the Virtual memory section.
Here select the Custom size option and provide the Initial size and Maximum size.
The initial size doesn’t matter much as the page file can quickly expand, putting a small value here like 300-400MB. In the maximum size, either enter twice as much value of your total RAM or equivalent to it. Therefore, if you have 8GB RAM, then either enter 8000 or 16000MB page file size. You can then click on Set and restart the PC to create the page file.
Note: The page file size will directly take space on your storage drive, making sure you have enough space there.
Disable startup apps and services
Many apps are configured to startup when Windows boots even if you don’t immediately need them on startup. They will slow down the boot speed and also keep eating resources in the background unnecessarily. This is especially a problem if the Windows that came with your PC is filled with manufacturer bloatware. You should disable all unnecessary startup apps or services to make sure your PC resources are not wasted.
Disable startup apps
To disable startup apps, press Ctrl+Shift+Esc keys to open up Task Manager and move to the Startup tab. You will see a list of all apps that are configured to start with Windows. Here you need to look for apps that you don’t use immediately at startup and disable them. To disable an app, select it and click on the Disable button at the bottom-right corner.
Make sure you don’t disable any app from Microsoft or your hardware manufacturer, like your graphics card manufacturer. Such apps are needed by the system to work properly.
Disable startup services
Some apps can also have background services that startup with Windows and eat unnecessary resources if you don’t need their service. You should disable them to ensure smooth working of your PC; here’s how: Press Windows+R keys to bring up Run dialog and type msconfig in it to open the System Configuration window.
Now move to the Services tab and check the checkbox next to Hide all Microsoft services. This will hide all system services and show you third-party services. Just uncheck the box next to the service you want to disable and click on Apply to confirm the changes.
Manage Windows 10 Privacy Settings and Background Apps
One reason I still have a soft spot for Windows 7 is that it didn’t introduce so many privacy-invasive apps and features like Windows 10. Everything in Windows 10 nags you to use Microsoft apps. And don’t even get me started on the number of background apps that collect information and eat resources while you may not even use them. Controlling all of Windows’ privacy-invasive features or deleting apps you don’t want to use isn’t an easy task. Most of these features aren’t even available upfront to disable; you have to tweak the registry just to disable them. No worries, though, I know just the software you need to manage all privacy settings and a lot more. W10Privacy is a completely free app for Windows 10 to manage all the Windows apps and services in one place and make sure only the data you allow to share is shared. Not only that, but it also comes with a bunch of tweaks to make your Windows experience better. Install the app and make sure you launch it as an administrator by right-clicking its icon and selecting Run as administrator. The app has multiple sections with related customizable settings listed below and color-coded. You can hover the mouse cursor over any settings to open up a complete description of what that setting does and how it affects your experience if you disable it.
You can read each setting’s description to learn what it does and disable/enable as you need. However, I will list down each section here and let you know what type of settings you can expect in them. Let’s see: Privacy: This section contains general privacy control settings like preventing Microsoft from collecting application usage data and diagnostic data. Most of the settings universally affect the operating system. Apps: Here, you can manage access to PC devices and access to Windows to apps data. For example, you can prevent apps from accessing your PC camera, microphone, or your calendar. Telemetry: I will not recommend you disable any setting here unless you work in an enterprise and know what you are doing. These settings use firewall rules to prevent Microsoft from sending your usage data back to their telemetry servers for improving their service. These rules can also brick Microsoft services like Skype or OneDrive, so it’s good not to mess with them. Search: Contains a few tweaks you can make to stop Microsoft from collecting information you put into the search bar. Networks: Basically manages your WiFi details privacy, like not sharing this information with other apps. Explorer: This section mostly contains tweaks to make Windows 10 function better, but it also has some privacy-related options like disabling ads in the explorer. Services: Lets you disable some of the Windows services that otherwise can’t be uninstalled, such as Biometric service or Windows Search. Most of these services are important, so you should avoid disabling them. Edge: Control some of the Microsoft Edge functions here and prevent it from sending browser data to Microsoft. Internet Explorer: Like the Edge section, this contains some tweaks to control Internet Explorer’s behavior. OneDrive: Use the settings here to stop OneDrive from storing data and automatically signing in. Tasks: Windows 10 runs many scheduled tasks automatically, like scanning with Windows defender and error reporting, etc. You can use the settings here to disable these scheduled tasks. Tweaks: This contains a bunch of productivity tweaks to make your Windows 10 experience better. For example, you can prevent Windows’s auto-restart after an update or automatically close apps that are not responding. Firewall: You can disable outgoing traffic of many Windows 10 services here, such as Parental Controls, Biometric, and Xbox, etc. Background apps: This section lets you stop apps from running in the background. This will only stop the apps from running in the background; you can still start and use it when needed. User-Apps: You’ll find a list of installed apps here to uninstall and re-install easily from here. Most of these apps can be uninstalled from Windows Settings, but you can also reinstall apps from here easily. Check the checkbox next to all the settings that you want to apply under these sections and then click on the Set changed settings button at the bottom-right corner to apply them. The W10Privacy app will restart to apply all these settings. You can always uncheck the checkbox next to an option to undo the effect.
I personally don’t use the W10Privacy app aggressively and keep most of the Microsoft services enabled. However, the app greatly helps me stop background processes, remove annoying functionalities, and disabling ads and related tracking in all areas of Windows 10. Alternatively, if you don’t like to do things manually, you may try Avira System Speedup to optimize Windows for maximum performance.
Ending thoughts
Of course, many other tweaks make your Windows performance better, like managing start menu tiles or managing display settings. You should definitely go through Windows 10 settings to make changes as you desire. However, the above-mentioned tweaks will surely help you put your PC in the most optimum state for day-to-day use. Next, explore premium antivirus to secure your computer.
![]()
![]()


![]()
![]()
![]()
![]()

![]()


![]()
![]()
![]()

