Working on a Windows PC is nothing less than a treasure hunt. There are many features hidden in plain sight that I never thought existed. While one can find plenty of utilities as a Windows power user, even an ordinary user has a lot to explore. One such feature to take note of is Sticky Keys. If you are a Windows user, chance are you have come across this prompt at least once: I have seen this quite a few times, only to annoyingly close it–without ever trying to know what this is about?
What are Sticky Keys?
Sticky Keys help you to use Modifier Keys (Ctrl, Shift, Alt, & ⊞) without needing to press them constantly. For instance, these can help you select all, copy and paste by pressing A, C, and V, instead of using Ctrl+A, Ctrl+C, and Ctrl+V. In short, they make a specific modifier key ‘stick’ until you turn them off. Besides, you can use shortcuts like Ctrl+Alt+Delete one keystroke at a time. And it’s very easy to turn them on and off, and you don’t need to open the Control Panel each time, or even once if you’re good with some keyboard shortcuts. Let’s see…
How to Turn on Sticky Keys?
There are various ways to enable Sticky Keys. We’ll see all possible ways in Windows 10 and 11.
Pressing Shift
This method is exactly the same for Windows 10 and 11. The easiest way to turn on this functionality is by pressing Shift five times in succession. Subsequently, you will see the prompt ‘Do you want to turn on Sticky Keys?‘ (as shown in the previous image) followed by a beep. Click Yes to proceed. The taskbar has this notification as an indication of the active Sticky Keys. However, this can sometimes hide inside the taskbar notification area, mentioned by the ⬆️ symbol placed beside other indicators.
Windows Settings
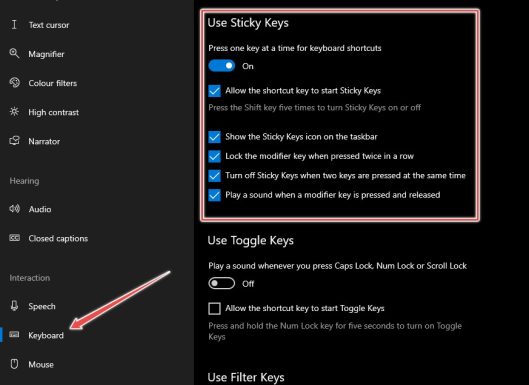
This slightly differs depending on which Windows version you have, so we’ll see both. Windows 10 Enter Settings > Ease of Access > Keyboard > Sticky Keys. However, you can directly search for Sticky Keys in the taskbar and click the appropriate option to land in this area. Windows 11 Here you need to find Settings > Accessibility > Keyboard > Sticky keys. All the options are identical to Windows 10 and function the same.
Control Panel
Turning on Sticky Keys from the Control Panel is easy, and the steps are identical for both Windows versions. Ergo, we’ll proceed with Windows 10. Navigate to Control Panel > All Control Panel Items > Ease of Access Centre > Make the keyboard easier to use > Set up Sticky Keys to open this menu: Here you can customize everything related to Sticky Keys as per preference.
Quick Settings (Windows 11)
This method is exclusive to Windows 11. Start with pressing ⊞ + A. Click Accessibility in the pop-over. Turn on the Sticky key toggle placed at the bottom. Check this: So these were some methods to turn this feature on. Let’s continue this with…
How to Use Sticky Keys?
While the settings are pretty basic, I’ll try to explain them to make this even more simple. We have already seen how to turn them on. Notably, pressing Shift five times is the easiest unless you want to tweak some settings. But we’ll proceed without changing anything in the Control Panel. Let’s take a common example of select-copy-paste, assuming Sticky keys are turned on. You will press Ctrl (modifier key) twice to lock it. Two beep sounds in succession will confirm the selection. This means the Ctrl is active and will remain so until we turn that off (we’ll see this later). Now all you have to do is use A, C, and V to select all, copy and paste, as the Ctrl is constantly ‘pressed.’ But you might also need to select selectively (😀) and not the whole content. For this, you need to lock one more modifier key–Shift. This can be similarly done by pressing Shift twice (take note of the two beeps again). Now you have Ctrl and Shift both in active mode, and you can use the other shortcut keys for selection (arrow keys) and copy-paste (C and V). For deselecting, press the particular modifier key (a different beep). Or press two modifier keys together to turn Sticky Keys off (another unique beep). Let’s summarize this:
Conclusion
We hope this made it clear to use Sticky Keys in Windows 10 and 11. But not only this; you can take a look at God mode in Windows, Windows 11 keyboard shortcuts, and many more Windows tips and tricks.

![]()


